Submit Forms Using Directus and Next.js
Directus provides a headless CMS, which when combined with Next.js will streamline content management. This post covers how to connect them to create and submit forms.
Before You Start
You will need:
- A new Directus project with admin access.
- Optional but recommended: Familiarity with data modeling in Directus.
- Set Up Your Directus Project
Set Up Your Directus Project
Start with a Directus Cloud or self-hosted clean install of Directus. Follow the steps below to configure Directus with the necessary collections and permissions.
First, using the new Directus instance, generate a static token for the admin user by going to the Users Directory. Choose the Administrative User, and scroll down to the Token field and generate a static token. Copy the token and save it. Do not forget to save the user, or you will encounter an "Invalid token" error.
Apply the CMS Template
Use the Directus Template CLI to apply the CMS template for your project by opening your terminal and running the following command:
npx directus-template-cli@latest apply
Choose Community templates, and select the CMS template. Fill in your Directus URL, and select Directus Access Token as the authentication method, filling in the token created earlier:
➜  Directus npx directus-template-cli@latest apply
(\   /)
 \\_//
 ( Õ Õ) "Let's apply a template!"
C(")(")
┌  Directus Template CLI - Apply Template
│
◇  What type of template would you like to apply?
│  Community templates
│
◇  Select a template.
│  CMS
│
●  You selected CMS
│
◇  What is your Directus URL?
│  http://localhost:8055
│
◇  How do you want to log in?
│  Directus Access Token
│
◇  What is your Directus Admin Token?
│  HL6bxxxxxxxxxxxxxxxxxxxxzzJ6kS3S
-- Logged in as Admin User
Loading 24 collections and 276 fields... done
Loading 66 relations... done
Loading 4 roles... done
Loading 7 policies... done
Loading 149 permissions... done
Loading 3 users... done
Loading 12 accesses... done
Loading 4 folders... done
Loading 32 files... done
Loading data for 24 collections... done
Updating 31 fields to required... done
Loading 1 dashboards... done
Loading 9 flows... done
Loading settings... done
Loading 1 translations... done
Loading 11 presets... done
Found 17 extensions total: 12 registry extensions (including 2 bundles), and 0 local extensions
-- Installed @directus-labs/ai-image-generation-operation
-- Installed @directus-labs/experimental-m2a-interface
-- Installed @directus-labs/super-header-interface
-- Installed @directus-labs/inline-repeater-interface
-- Installed @directus-labs/seo-plugin
-- Installed directus-extension-wpslug-interface
-- Installed @directus-labs/ai-writer-operation
-- Installed @directus-labs/liquidjs-operation
-- Installed @directus-labs/card-select-interfaces
-- Installed @directus-labs/simple-list-interface
-- Installed @directus-labs/command-palette-module
-- Installed directus-extension-group-tabs-interface
Installing 12 extensions... done
Finished installing extensions
------------------
Template applied successfully.
The Directus Template CLI will make the required changes to Directus to add the CMS template. This includes creating the necessary collections, fields, and relationships to manage your content.
Configure CORS
If you are self-hosting your Directus instance, you might need to configure CORS to enable your Next.js app to interact with it. Since Next.js development server serves the app at http://localhost:3000, you can get started by setting the following environment variables:
environment:
  CORS_ENABLED: "true"
  CORS_ORIGIN: "http://localhost:3000"
In a production environment, you should only allow your app's trusted domains in the CORS_ORIGIN list.
Form Submission Model
The CMS template ships with a form submission model. This model is used to store the data submitted by users through the forms created in Directus.

The form submission model is a simple collection that connects form fields to the form submission record.
Form Submission Access
A Directus role is created for the form submission model. This role is used to control access to the form submission data and is already set up with the necessary permissions.
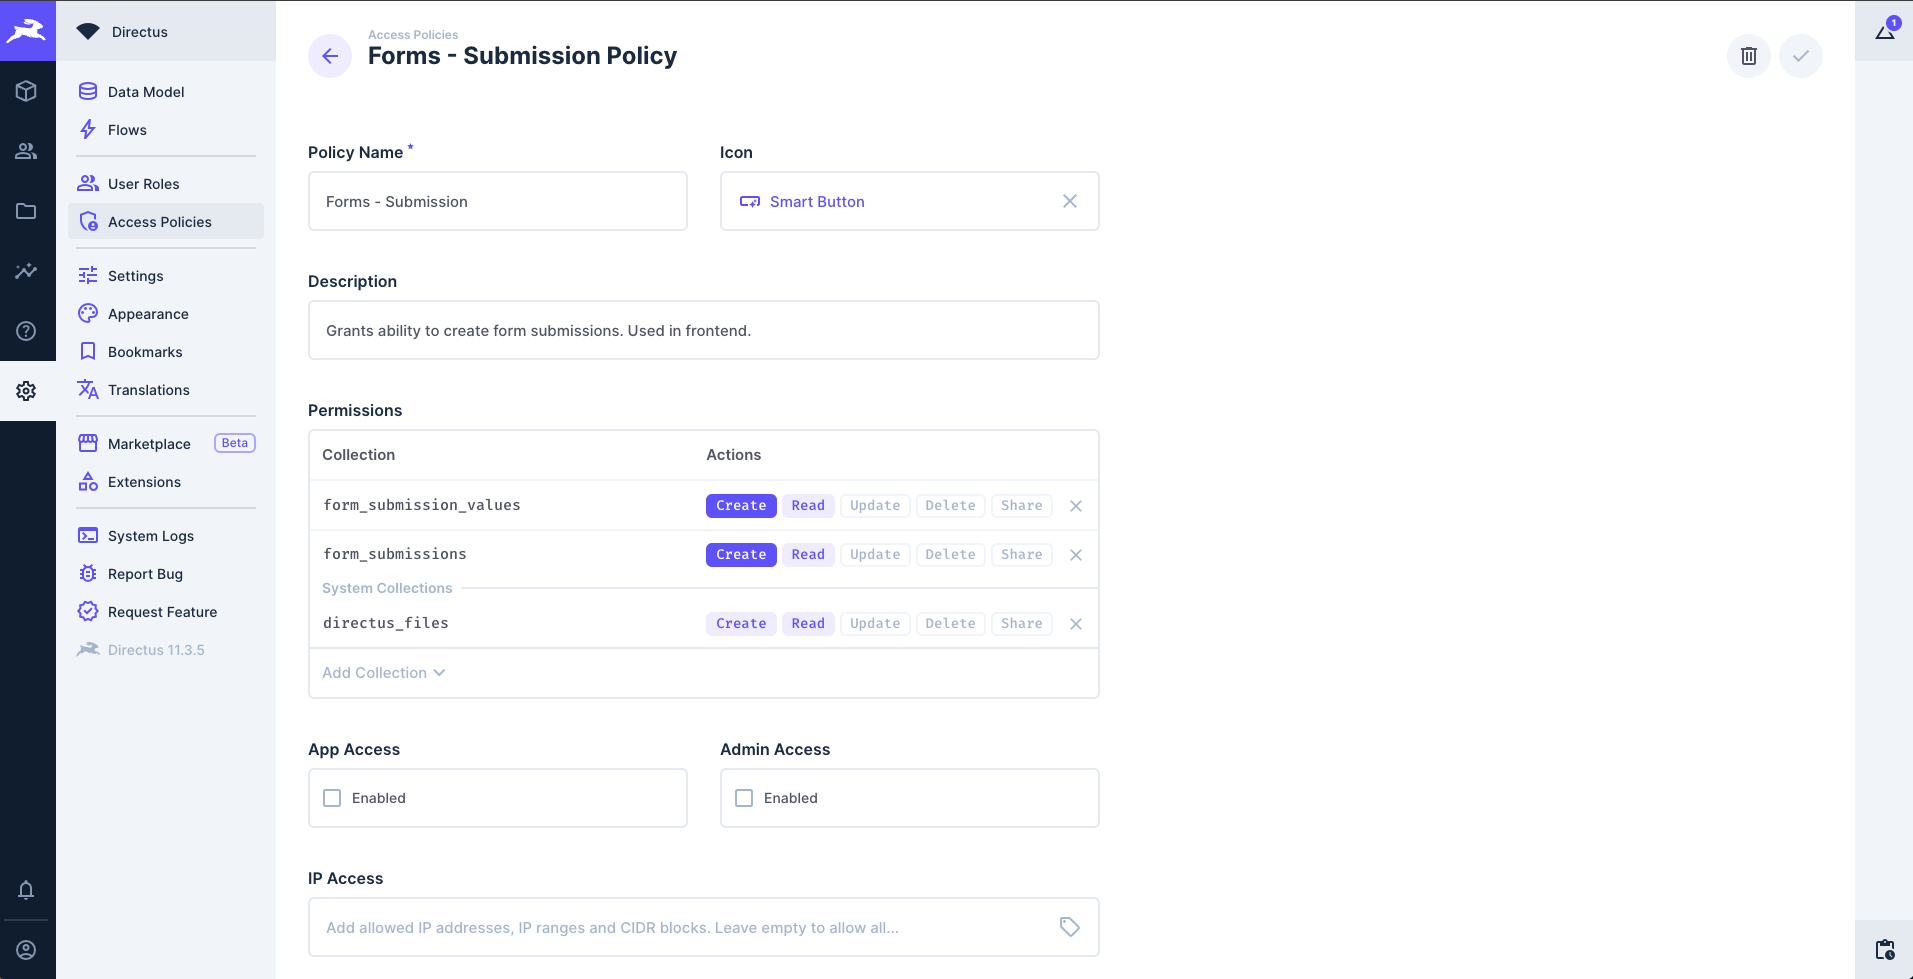
Additionally, the role has already been applied to the "Frontend Bot" user. This user is meant to represent your Next.js frontend app. To allow it to send form submissions to your Directus instance, select the "Frontend Bot" user in the Directus user directory and scroll down to the "Token" section. Here, generate a token and save the user.
This token will be used to authenticate the Next.js app with Directus and will have the form submission permissions required to submit the form.
Set Up Your Next.js Project
Once that's done, create a new Next.js app by running the following command:
npx create-next-app \
  directus-next-form \
  --js \
  --app \
  --eslint \
  --no-src-dir \
  --no-tailwind \
  --turbopack \
  --import-alias "@/*"
Next, change your terminal's working directory into the newly created project directory and install the Directus SDK into it:
cd directus-next-form
npm i @directus/sdk
Now, open the project directory in your code editor to start building the app. First of all, clear out the CSS in app/globals.css and replace the code in app/page.js with the following:
export default function Home() {
  return <div />
}
Set up Directus
To make it easy to access the Directus instance through the SDK, you should create a helper file that you can import anywhere in your Next.js app. To do that, create a new directory called lib in the project directory and save the following code snippet in a file called directus.js in it:
import { createDirectus, rest, authentication, staticToken } from '@directus/sdk';
const BACKEND_URL = "http://localhost:8055/"
const client = createDirectus(BACKEND_URL)
    .with(staticToken("your-frontend-bot-token-here"))
    .with(rest({ credentials: 'include' }));
export default client;
Make sure to replace the your-frontend-bot-token-here with the static token you created for the "Frontend Bot" user. You could also supply this via environment variables for an added layer of abstraction.
Important: Because Next.js extends the native fetch API with a force-cache configuration by default, you may sometimes run into scenarios where Next.js returns stale data. To fix this, update the rest() composable to add the following option:
.with(rest({
      onRequest: (options) => ({ ...options, cache: 'no-store' }),
}))
Create the Page with the Form
In Directus dashboard, go to Content > Forms. Here, you will see that two forms are included with the CMS template. You will use the one called "Newsletter" for this tutorial.
Click on the form and you will see it contains two form fields: "first-name" and "email". Also, look at the URL of this page, it will be something similar to http://localhost:8055/admin/content/forms/5da3d356-d818-434f-b225-db35c418bbb6. In the URL, 5da3d356-d818-434f-b225-db35c418bbb6 is the form ID. You will need to copy this to use it in your Next.js app.
In your app, you need to display the form to the user. To do that, paste the following code in the app/page.js file:
'use client';

import { useState, useEffect } from 'react';
import { createItem, readItem } from '@directus/sdk';
import client from '../lib/directus';

export default function Home() {
  const formId = "5da3d356-d818-434f-b225-db35c418bbb6";
  const [form, setForm] = useState(null);
  const [fields, setFields] = useState([]);
  const [loading, setLoading] = useState(true);
  const [error, setError] = useState(null);

  useEffect(() => {
    const fetchForm = async () => {
      try {
        const response = await client.request(readItem('forms', formId, {
          fields: ['*', 'fields.*']
        }));

        setForm(response);

        // Initialize fields for submission
        setFields(response.fields.map((field) => ({
          field: field.id,
          value: ''
        })));

        setLoading(false);
      } catch (err) {
        console.error('Error fetching form data:', err);
        setError(err.message);
        setLoading(false);
      }
    };

    fetchForm();
  }, [formId]);

  const handleFieldChange = (index, value) => {
    setFields(prevFields =>
      prevFields.map((field, i) =>
        i === index ? { ...field, value } : field
      )
    );
  };

  const handleSubmit = async (e) => {
    e.preventDefault();

    try {
      const result = await client.request(createItem('form_submissions', {
        form: formId,
        values: fields
      }));

      console.log('Form submitted successfully:', result);

      // Reset form after successful submission
      setFields(form.fields.map((field) => ({
        field: field.id,
        value: ''
      })));

      alert('Form submitted successfully!');
    } catch (err) {
      console.error('Error submitting form:', err);
      alert('Error submitting form. Please try again.');
    }
  };

  if (loading) {
    return <div>Loading form...</div>;
  }

  if (error) {
    return <div>Error loading form: {error}</div>;
  }

  return (
    <div>
      {form && (
        <form onSubmit={handleSubmit}>
          {form.fields.map((field, index) => (
            <div key={field.id} style={{ marginBottom: '1rem' }}>
              <label htmlFor={field.name}>{field.label}</label>
              <input
                id={field.name}
                name={field.name}
                type="text"
                value={fields[index]?.value || ''}
                onChange={(e) => handleFieldChange(index, e.target.value)}
                required={field.required}
                placeholder={field.placeholder}
                style={{
                  display: 'block',
                  marginTop: '0.5rem',
                  padding: '0.5rem',
                  width: '100%',
                  maxWidth: '300px'
                }}
              />
            </div>
          ))}
          <button type="submit" style={{
            padding: '0.75rem 1.5rem',
            backgroundColor: '#007bff',
            color: 'white',
            border: 'none',
            borderRadius: '4px',
            cursor: 'pointer'
          }}>
            Submit
          </button>
        </form>
      )}
    </div>
  );
}
Make sure to paste the form ID you copied from the Directus dashboard in the value of the formId variable.
The component above uses the Directus SDK to fetch the form data. It then uses this form data to generate the form fields dynamically on the page. The fields state array that stores the value and the field id for each field.
When you submit the form, the handleSubmit function is called, which sends the form data to Directus and creates a form_submission item.
You can verify this by visiting the Directus admin panel and checking the form_submissions collection after submitting the form. You should see a new item created with the form data.
Form Flows
Sending an email notification is a common step in form submission workflows. In Directus, the CMS template includes a built-in flow to automate this process.
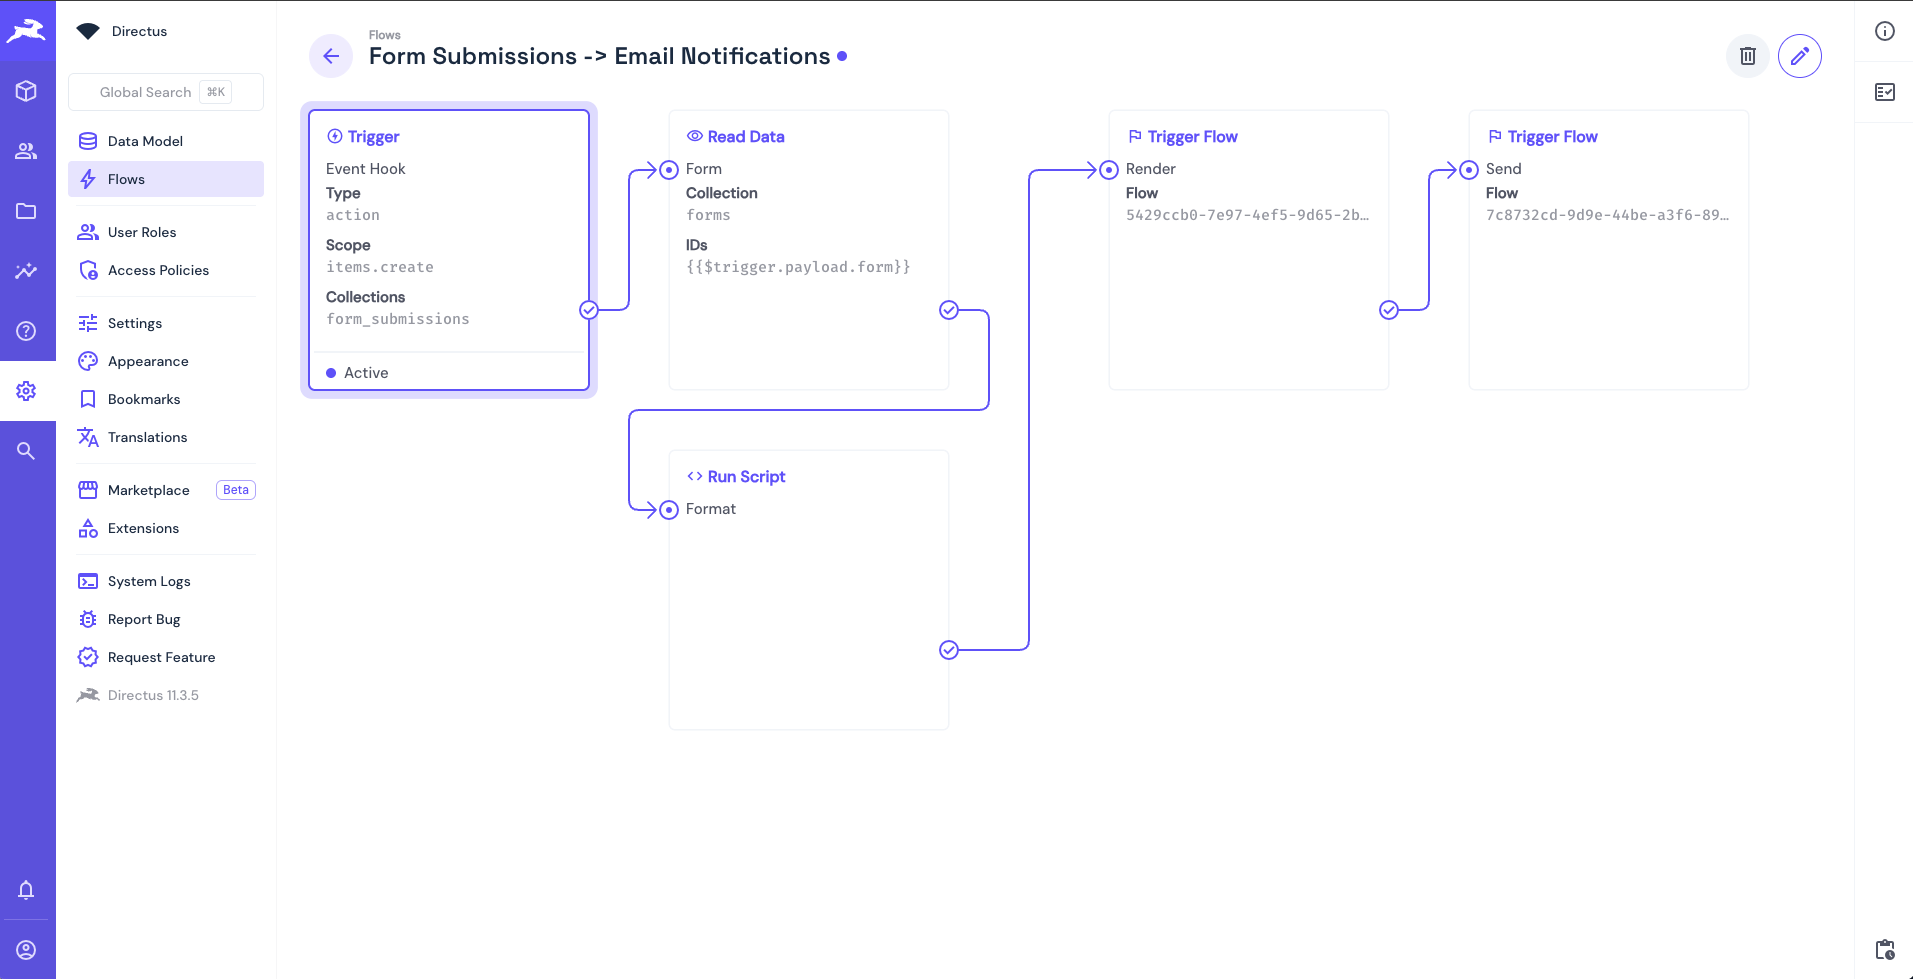
Here’s a breakdown of how the flow works:
- The flow is triggered automatically when a new item is added to the Form Submission collection.
- It retrieves the associated form details using the provided form ID.
- A custom JavaScript function runs to validate and format the submitted data for email delivery.
- The system then invokes a separate
renderflow, which generates the email content using Liquid templating. - Finally, a dedicated
sendflow dispatches the formatted email to the user.
Form Validation and Error Handling
To finalize the newsletter sign up process, edit app/page.js, to add error handling and successful form submission.
Replace the handleSubmit function with the following code:
const [success, setSuccess] = useState(false);
const [submitError, setSubmitError] = useState(null);

const handleSubmit = async (e) => {
  e.preventDefault();

  try {
    // Optional email validation for the email field
    form.fields.map((field, index) => {
        if (field.validation !== null) {
            if (field.validation === "email" && !validateEmail(fields[index].value))
            throw new Error("Please enter a valid email")
        }
    })

    const result = await client.request(createItem('form_submissions', {
      form: formId,
      values: fields
    }));

    setSuccess(true);
    setSubmitError(null);

    // Reset form
    setFields(form.fields.map((field) => ({
      field: field.id,
      value: ''
    })));
  } catch (err) {
    setSubmitError(err.message);
  }
};

// Optional email validation for the email field
const validateEmail = (email) => {
  return String(email)
    .toLowerCase()
    .match(
      /^(([^<>()[\]\\.,;:\s@"]+(\.[^<>()[\]\\.,;:\s@"]+)*)|.(".+"))@((\[[0-9]{1,3}\.[0-9]{1,3}\.[0-9]{1,3}\.[0-9]{1,3}\])|(([a-zA-Z\-0-9]+\.)+[a-zA-Z]{2,}))$/
    );
};
This code handles the success and error states of the form submission. If you submit successfully, the form resets and displays a success message. If there is an error, it displays the error to you.
On top of error handling, this code snippet also implements an optional validation function for the email field. The form_field schema created by the CMS template allows for setting up validations on the forms fields using the validation field. You can set it to email, for example, to set the field to be validated for a legitimate email address. You can test this out by updating the validation field in Form Fields > Email record in your Directus instance.
To display the error and success messages to you, replace the return statement with the following code:
return (
  <div>
    {form && (
      <form onSubmit={handleSubmit}>
        {success ? (
          <div style={{ color: 'green', marginBottom: '1rem' }}>{form.success_message}</div>
        ) : (
          <div>
            {form.fields.map((field, index) => (
              <div key={field.id} style={{ marginBottom: '1rem' }}>
                <label htmlFor={field.name}>{field.label}</label>
                <input
                  id={field.name}
                  name={field.name}
                  type="text"
                  value={fields[index]?.value || ''}
                  onChange={(e) => handleFieldChange(index, e.target.value)}
                  required={field.required}
                  placeholder={field.placeholder}
                  style={{
                    display: 'block',
                    marginTop: '0.5rem',
                    padding: '0.5rem',
                    width: '100%',
                    maxWidth: '300px'
                  }}
                />
              </div>
            ))}
            {submitError && <div style={{ color: 'red', marginBottom: '1rem' }}>{submitError}</div>}
            <button type="submit" style={{
              padding: '0.75rem 1.5rem',
              backgroundColor: '#007bff',
              color: 'white',
              border: 'none',
              borderRadius: '4px',
              cursor: 'pointer'
            }}>
              Submit
            </button>
          </div>
        )}
      </form>
    )}
  </div>
);
Conclusion
The Directus CMS template provides a starting point for building a CMS driven website, including form submission. With minimal coding you can create a form that submits data to Directus and handles the submission flow.